Subbing for Mechele and Steve I'd been a regular participant in Mechele and Steve's Sunday Handstand Clinic - it's a great community and this dynamic duo are simply FAB. I got a message from the studio asking me if I can substitute for this Sunday as they can't make it. Hmmmm. Handstand has long eluded me despite my marginal gains. This offers me the opportunity to research and develop a sequence that may unlock some hidden secret...and of course, share with the class.
Disclaimer Let's get this clear at the outset - I'm NOT packaging myself as the Handstand Master. There are yogis in Cebu who deserve that title - not me. I've long been practising on my handstand for years now. I can put myself vertically on a handstand with considerable ease - but I can't hold my handstand into a steady state for more than 15 seconds. Not yet. Only when I can hold it steady for a full minute (min) can I consider it a handstand. I know the techniques enough to teach it, but just like anything else, it boils down to practise...practise...and more practise.
The techniques listed here are by no means the definitive be-all and end-all to a successful handstand. Every successful handstander (for lack of a better word), will probably have his/her own developed technique. But give this technique a fair chance as it has proven to be of benefit to many subscribers.
Managing Expectation Let's manage your expectation first - you won't be able to do a handstand just by attending this clinic. But you'll get the big picture on how to proceed with the practice. Handstand is a difficult asana that takes years to develop. It demands strength, balance, focus, stamina and requires full-body coordination from the top of the head to the feet. But just like everything else, with persistent practice, you will at one point nail the handstand.
Dependencies To perform a good handstand, most people think it's just a matter of balance. Yes, but there's more to it:
balance - yes, let's put this first as it's the most obvious and most self-explanatory
strength - there are many muscles needed to support you in getting into and holding a handstand - and they all need to be strong. The weakest link will cause the handstand to fail. The core needs to be developed as it carries a lot of load on a handstand, especially when engaging in bandhas. Shoulder muscles carry a lot of weight as well and they need to be strong.
flexibility - on a handstand, the should is perhaps the lynchpin(central cohesive source of stability and security). If the shoulder is not open enough, an angle is created and the wrist, shoulders and hips cannot be vertically stacked
technique - yes, it's not just balance, strength and flexibility. Technique is a big factor, and there are lots of techniques. There is no one-technique fits all. You have to experiment until you find one that suits you.
coordination - all the muscles involved from the tips of the fingers to the tips of the toes need to function as a singularity - they have to talk to each other and coordinate with each other like many musical instruments in a symphony. All the individual body parts need to do their part in sustaining a handstand
endurance / stamina - you may have the strength to go into a handstand. But how long can you hold it? Holding a handstand is far more difficult than holding a high plank.
practice - it's so obvious, why am I even mentioning it? Unlike doing a high plank where you can nail it on the first attempt, a handstand, even if you have all the ingredients present, will not amount to anything until you devote a lot of time practicing. To underscore this point, Kino McGregor, the shining star of Ashtanga Yoga, admitted taking 5 years to master the handstand.
Given that, the asana warm-ups to this session will be focused on the core, shoulder openers, wrist conditioning and upper arm strength.
In your private yoga practice, give greater emphasis on doing Navasana (boat pose - front abdominal muscles), Vasisthasana (side plank - obliques), Salabhasana (locust pose for lower back muscles) and Chaturanga (push-up motion for shoulder power).
Benefits
more blood flow to the perception Organs - it puts the perception organs (eyes, ears, tongue, nose, brain) below the heart and facilitates blood flow. It doesn't have to fight gravity
restacking of the internal Organs - it displaces the internal organs upwards neutralizing the downward push of the diaphragm when breathing
it builds strength - handstands do not only strengthen the shoulders and upper arms, but the entire body as well because it requires a full-body conditioning workout.
focused mindfulness - even though a handstand looks static, the mind is intensely focused on holding the handstand and the entire body needs to be nimble and responsive from finger pressure, to abdominal bandhas, weight transfer, etc.
body awareness - awareness of what your body is doing in space. This helps us in other sports and activities
fun - handstands are the coolest!!!
acceptance - learn to deal with what the body can and cannot do. You become more accepting
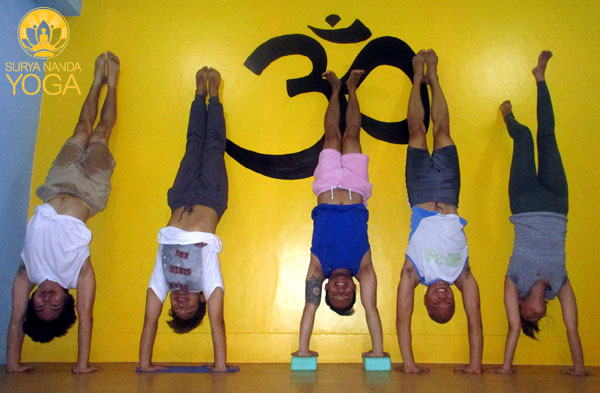
Handstand class: Lambert, Gee Co, Ryan Suedo, myself and Jessica
Class Instruction Begins Here
I WRIST CONDITIONING
The wrist has many moving parts and quite vulnerable when we subject it to bear weight, transfer weight and repetitive movement. Over time without proper support, an injury may happen. Also, on a handstand, the wrists bear the full body weight. Keep in mind that on an upright pose, two thick ankles support our body weight - now, we transfer that same load a pair of wrists half the size of ankles.
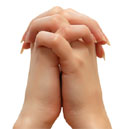
Interlaced Hands Rotation() Clasp your hands in front of your chest with elbows resting on the rib cage. Rotate your hands in a figure 8 motion (or infinity motion). Other side.
Tabletop Roll with Hands Facing Forward() On Tabletop, with hands facing forward, try to move your body clockwise in a circular motion. Widen the circle as you progress. Back to center. Otherside.
Finger Flexion() On Tabletop, with hands facing forward, put your left hand on the center, and use your right hand to pull the individual fingers of the left hand while the upper palm is pressed against the mat. Otherside.
Tabletop Roll with Fingers Facing Back() On Tabletop, with fingers facing back, try to move your body clockwise in a circular motion. Widen the circle as you progress. Back to center. Otherside.
Tabletop SideRoll with Fingers Facing Back Palms Up() On Tabletop, with fingers facing back and palms facing up, try to move your body back until you feel the wrist stretch and start moving your pelvis from left to right. Ensure that the arms are straight to isolate the stretch on the wrists.
II LIGHT WARM-UP STRETCH
Child's Pose(Balasana) Let's all find ourselves in Child's Pose, knees wide to accommodate the shoulders. Reach out forward with your fingers and sink the shoulders down keeping the arms straight, elbows straight. Feel the stretch on the shoulders. Inhale, lift an inch looking forward and reach out some more. Drop down deeper.
Cat and Cow Pose(Bitilasana | Marjaryasana) Bring your body up on Table Top, shoulders above the wrist, hips above the knees. Inhale, sink the belly down, tailbone out, face slightly lifted. Exhale, round the back, tuck the tailbone in, neck remains neutral. Repeat.
Downward Dog(Adho Mukha Svanasana) Let's all find ourselves in Downward Dog, but be easy, we're starting cold here. Just acclimatize into the pose, pedal your heals up and down, bending the knees and moving the hips from side to side. Maybe the heels are still not touching the mat...that's ok. We'll sink slowly into the pose.
Relaxed Standing Forward Bend, Hanging Let's slowly walk our hands back towards our toes...and let's fold our arms into our elbows, upper body hingeing from the hips. Knees could be slightly bent and we simply do nothing for now...just allowing gravity to do its work. As we stay here, feel the back of the legs loosening up, feel the lower back muscles letting go. Breathe! still mindful of the Bandhas....pulling up the perineal muscle and engaging our abdominals 2 inches below our navel.
Hand Walking() Drop your hands onto the floor and begin to walk your hands to your left, twisting the body in the process. Where you reach your edge, stop, hold and breathe. Release the hands and do the other side.
Spine Roll-Up
release the arms and on one long inhale, with a rounded back, vertebrae by vertebrae, roll-up into standing (Samasthitihi)
III SHOULDER OPENERS
A flexible shoulder opens up to properly align the body into a handstand
Forward Fold with Clasp() Clasp the hands behind back, inhale lengthen, and on the exhale, forward bend, windmilling the arms towards the floor. Hold and breathe.
Reverse Prayer(Pashchima Namaskarasana) Place your palms together behind you and see how far you can move the hands up your back. Hold and breathe.
Cow Face Arms(Gomukhasana) Left hand extends back and bends at the elbow, top of the hand against the back. Right hand extends forward, windmilling its way to the top, then to the back, bending by the elbow until the two hands or fingers meet. Clasp. Hold and breathe. Other side.
Eagle Arms(Garudasana) Inhale stretching your arms wide to the sides and get them crossed together in front of you, left arm below the right arm. Bend both elbows and see if you can clasp your hands together, fingers interlaced. Inhale and lift your elbows as high up while trying to stretch your arms forward. Feel the front of the shoulders being pulled together. Hold and breathe. Other side.
LYING DOWN
Bow(Dhanurasana) Lie flat on your mat belly down. Bend your knees and hold on to your ankles. Inhale lift the chest up and try to stretch your legs, pulling the arms, pulling the shoulders back. Hold and breathe. Other side.
Criss-Cross() Lie flat on your mat belly down. Lift your chest up and try to reach out your left arm as far to the right as possible. Right arm over the left, reaches as far left. Inhale lengthen, exhale sink. Hold and breathe. Other side.
Thread the Needle() Get into Child's Pose and lift the pelvis up. With a straight right arm, twist the should with the left arm passing its way under the right arm. Reach as far to the side with the left hand. Hold and breathe. Other side.
Eight Point Shoulder Opener() Lie on your left side, head supported by a block. Clasp your hands behind you and lift the hands up, keeping the arms straight. With the left shoulder on the mat, twist the pelvis to the right so that it rests on the buttocks. Feet flat on the mat with knees bent. Hold and breathe. Other side.
Elbows on Blocks() Place two blocks on top of the other in front of your mat. Kneel down with wide knees, toes tucked-in, hands clasped together and rest your elbows on the blocks. Try to sink your chest and your head below your upper arms. The blocks should be in front of the top of your head. Inhale lengthen, and on the exhale, sink your chest down, pulling on the shoulder. Feel the shoulder stretch. Hold and continue breathing.
IV CORE A strong core is an essential component to a successful handstand. Surprisingly, core is also the key to protecting your wrists. A strong core increases the efficiency of the rotator cuff muscles, which in turn stabilizes the shoulders allowing it to carry more load and lessen the load passed on the wrists.
Side Plank(Vasisthasana) (Vinyasa until upper plank): put your full body weight on the left hand and roll-up the side shoulder, right hand reaching up, keeping the body straight and linear. Look at your right hand and breathe. Other side.
Boat Pose(Navasana) Vinyasa until Downward Dog, jump through or step through your hands for a seated pose. Bend both your knees and grab behind the thighs, keeping the back straight. Inhale lengthen, and release the legs on the exhale, extending the arms forward, straightening the legs pointed 45 degrees to the corner of the ceiling. Breathe for 5 counts. Cross your legs supporting your body by putting your hands beside you, inhale lengthen, and lift on the exhale. Hold for a few breaths. And release, back into Boat. 3x. From crossed legs, see if you can snap your legs back into plank.
Locust Pose(Salabhasana) From plank, lower yourself down completely, extending your arms forward. Inhale lengthen, on the exhale, lift your chest, lift your arms, lift your knees and thigh. Breathe. Spread your wings like a jet plane, lifting your chest ever higher. Breathe. Back to Superman or Superwoman...lift...breathe...5...4...3...2...1....Child's Pose everyone. You did well. Finish off with a Vinyasa.
V GETTING INTO A HANDSTAND There are many ways to get into a handstand. Every handstand guru has his/her own style. Three proven approaches are listed below - the yogic kick(back on the wall), gymnastic handstand press(back on the wall, advanced) and the walking up the wall(front on the wall, advanced):
Yogic Kick Kino MacGregor is one of the most iconic figures in Ashtanga Yoga today, having learned from the master himself, Pattabhi Jois. Despite that, it took her 5 years to perfect the handstand.
Handstand Press This is the most advanced, used by gymnasts, requiring utmost strength, balance and control. The training for this approach is layered - a training regiment within a training regiments. There is no momentum - no kick. Straight legs far apart, both hands are pressed on the mat shoulder width apart, arms straight, hips as close to the elbows as possible, move the body weight as far forward as you can, shoulders going beyond the wrist line (to establish the fulcrum). You should be feeling you legs are slowly being unweighted until only the tips of the toes are touching the mat. Slowly lift your pelvis up together with your legs until the torso is vertically up - hips, shoulders and wrists are stacked into a straight vertical line. Gently move your legs together.
Walk to Wall Facing Wall
This is more advanced than the Yogic Kick because when you get tired holding from a Yogic Kick, you can simply bring your legs down. Not so with Walk to Wall. When you get tired on this, you still have to walk your hands forward until you can step down. If you are become too fatigued on the wall, you won't have enough strength to walk your hands and you'll simply have to crash down, hopefully tucking your head so you can roll down.
Handstand Up and Down Wall Walk() Downward Dog with feet near the wall. Slowly walk your feet up the wall as you walk your hands closer to the wall. When vertical, come back and repeat.
VI WALL-SUPPORTED HANDSTAND WITH SECTIONAL FOCUS
There are many elements to a successful handstand and they must all be unified together at the same time to make it work. A weak link in that chain can cause the handstand to fail. Handstand requires full body coordination.
We will all go to the wall and practise our handstands with isolated focus on the elements that we need to engage. We won't stay too long on the handstand so as not to tire-out the little muscles we need to keep our handstand stable.
Hand and Finger Focus() Fingers should be as spread out as much as possible to widen the base for greater control. The index finger should be pointed forward. The body weight should be centered on the upper palm area where the base of the fingers are. This serves as your fulcrum. If you overbalance, you can push against the fingers to tip you back. If you underbalance, you can push against the palm-base to make the correction. 30 secs.
Shoulder and Arm Focus() Handstand on the wall, so our backs are facing the wall, with fingers about a foot away from the wall (this gives more room for the shoulders to move). Straighten the arms and pull the shoulders back as you push the chest forward - this opens up the shoulders. Focus on the shoulders. 30 secs.
Head Focus() Best to keep the head within your shoulders than to lift it up to look at the floor. The spine follows the curvature of the head. So if the head is pulled out, the spine follows and you end up in a banana shape. Best to tilt the head minimally and just look 'upwards' with the eyes to see the floor - your head is still in and your back remains straight. 30 secs.
Torso Focus() Handstand on the wall, so our backs are facing the wall. Focus on the torso and engage the abs, rib cage reaching down to the pelvis as the lower back is straightened. Without this engagement, the legs tend to fall back behind creating a circular curvature on the spine. Breathe and isolate the focus there. 30 secs.
Butt Cheek Focus(Mula Bandha) Handstand on the wall, so our backs are facing the wall. Squeeze the butt cheeks and squeeze the anal muscle. This is essentially the Mula Bandha. Play with it, contracting and easing up and contracting. 30 secs.
Feet and Legs Focus() Handstand on the wall, so our backs are facing the wall. Focus on the feet pointed up. Focus on the legs being straight and together. Engage the feet and the legs into a singularity. 30 seconds.
Handstand Integration on a Wall() Take a full one minute on the wall and integrate all the elements into a unified singularity, being mindful of the feet direction, legs being together and straight, abs engaged straightening the lower back, arms rotated out to open the shoulder, head minimally tilted, etc. It helps to see the full body as one engaged muscle (think of your entire body as one phallic erection!).
Freestanding Handstand Integration() Take a full one minute by the wall but not resting on it, and integrate all the elements into a unified singularity. If the feet leans on the wall, tap against it and try to regain balance by using the finger controls. Repeat until too tired to go on. At this point, the finer muscle strands needed for a balanced handstand is already too fatigued to do anything anymore. So we shift into brute force conditioning.
VII HANDSTAND CONDITIONING EXERCISES
This routine was done last because it doesn't require balance - just brute power. Handstand requires the use of minor muscle strands that easily get tired. We want to use these fine muscles for balance and execution for the above - to conserve energy.
Handstand Traverse Wall Walk() Handstand on the wall facing the wall. Walk the hands along to the other side of the wall and then come back.
Block Rotation() With 2 hands on each block, handstand with back facing the wall. Lift the right hand, put it on the floor and lift the left hand and put it on the floor. Now, put the right hand back on the block and do the same thing for the left hand. You will essentially be doing a one-hand push up as you transfer your weight to the other hand on the block. Repeat.
Handstand Hold on a Wall() Do a wall handstand facing the wall and hold it there for a minute. Release and rest for 30 secs. Repeat and hold for 30 secs. Release and rest for 30 secs. Repeat but do the handstand with the back facing the wall.
Freestyle Handstand() Use the remaining time to do your own freestyle practice.
VIII WINDING DOWN
Corpse Pose(Savasana) Lie flat on your mat, feet dangling on its side, palms facing up. Let go of everything. Dissolve. Relax completely.

 Interlaced Hands Rotation ()
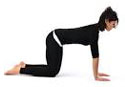 Tabletop Roll with Hands Facing Forward ()
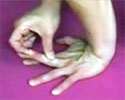 Finger Flexion ()
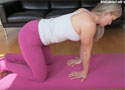 Tabletop Roll with Fingers Facing Back ()
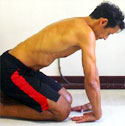 Tabletop SideRoll with Fingers Facing Back Palms Up ()
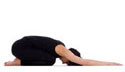 Child's Pose (Balasana)
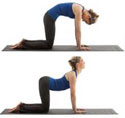 Cat and Cow Pose (Bitilasana | Marjaryasana)
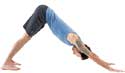 Downward Dog (Adho Mukha Svanasana)
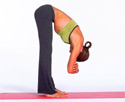 Relaxed Standing Forward Bend, Hanging
 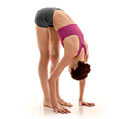 Hand Walking ()
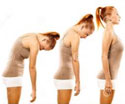 Spine Roll-Up
 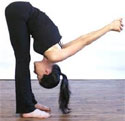 Forward Fold with Clasp ()
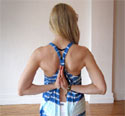 Reverse Prayer (Pashchima Namaskarasana)
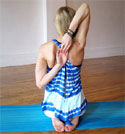 Cow Face Arms (Gomukhasana)
 Eagle Arms (Garudasana)
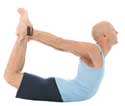 Bow (Dhanurasana)
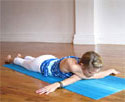 Criss-Cross ()
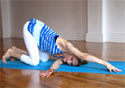 Thread the Needle ()
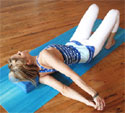 Eight Point Shoulder Opener ()
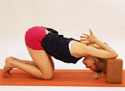 Elbows on Blocks ()
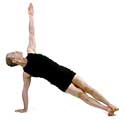 Side Plank (Vasisthasana)
 Boat Pose (Navasana)
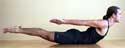 Locust Pose (Salabhasana)
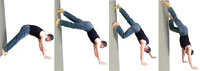 Handstand Up and Down Wall Walk ()
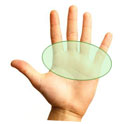 Hand and Finger Focus ()
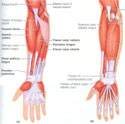 Shoulder and Arm Focus ()
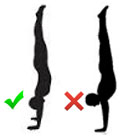 Head Focus ()
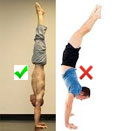 Torso Focus ()
 Butt Cheek Focus (Mula Bandha)
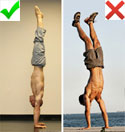 Feet and Legs Focus ()
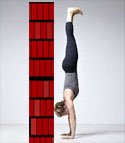 Handstand Integration on a Wall ()
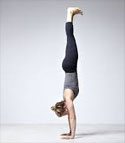 Freestanding Handstand Integration ()
 Handstand Traverse Wall Walk ()
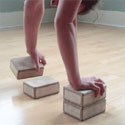 Block Rotation ()
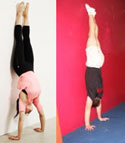 Handstand Hold on a Wall ()
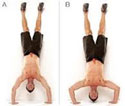 Freestyle Handstand ()
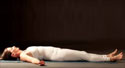 Corpse Pose (Savasana)